A Script to Print ModelState Errors and Field Names

This will write to the Output Window all the errors that are being thrown from the ModelState of an asp.net MVC Razor app.

var errors = ModelState.Where(m => m.Value.Errors.Count() > 0);
foreach (var kvp in errors)
{
    System.Diagnostics.Debug.WriteLine(string.Format("{0}:{1}", kvp.Key, kvp.Value.Errors[0].ErrorMessage));
}

The script above is helpful if/when you receive ModelState errors in your MVC Controller for no easily discernible reason. In other words, the output of the script above will print which Model fields are causing the ModelState.IsValid to return false.

Quick-And-Dirty Example On ASP.NET MVC Client Side Validation

This post will walk you through a very simple example on how you can implement Client-Side Validation using the unobtrusive validation support library for jQueryand jQuery Validate, and ASP.NET MVC using Visual Studio 2010.

Step 1: Using Visual Studio 2010, create a new “ASP.NET MVC 4 Web Application”. Give a name for the new Project – In this example I named it “ClientSideValidation”


Step 2: Select an “Empty” template for the Project


Step 3: Add a New Folder to the Project and name it “Resources”. Once done, create sub-folders (under Resources) and name them CSS, Javascript, and Resx.


Step 4: Add a new Style Sheet (.css file) to the “CSS” directory that you just created and name it “ValidationStyles.css”


Step 5: Copy/Paste these styles to your newly created “ValidationStyles.css” file (These styles will be used by the jQuery pack that does the client-side validation)

/* Styles for validation helpers
-----------------------------------------------------------*/
.field-validation-error
{
    color: #f00;
}

.field-validation-valid
{
    display: none;
}

.input-validation-error
{
    border: 1px solid #f00;
    background-color: #fee;
}

.validation-summary-errors
{
    border: 1px solid red;
    padding: 5px;
    margin: 2px;
    background-color: #FFE6E8;
    font-size: .9em;
    color: #f00;
}

.validation-summary-valid
{
    display: none;
}

Step 6: Go to http://www.jquery.com and download the latest jQuery pack and save the pack to your “\Resources\Javascript” directory (at the time of this post, the latest jQuery pack is version 1.8.2 and the name of the pack is “jquery-1.8.2.min.js“).


Step 7: In Windows Explorer, navigate to “C:\Program Files (x86)\Microsoft ASP.NET\ASP.NET MVC 4\Packages\jQuery.Validation.1.8.1\Content\Scripts\”, then copy/paste the jQuery pack named “jquery.validate.min.js” to the “\Resources\Javascript” directory in your Project.


Step 8: In Windows Explorer, navigate to “C:\Program Files (x86)\Microsoft ASP.NET\ASP.NET MVC 4\Packages\Microsoft.jQuery.Unobtrusive.Validation.2.0.20505.0\Content\Scripts”, then copy/paste the “jquery.validate.unobtrusive.min.js” file to your \Resources\Javascript directory in your Project.


Step 9: Add a new Resource file to your \Resources\Resx directory named “ValidationStrings.resx“. Then add the following Name and Values to your .resx file:

Name Value
StringLengthRange The string must be between {2} and {1} characters
NumberRange The number range must be between {1} and {2}
StringMaximumLength The string must not be more than {1} characters


Step 10: Add a new class to the “Models” directoryName the class as “Person” and copy/paste the code below to your Person class:

public class Person
    {
        [Required]
        [StringLength(80,ErrorMessageResourceType=typeof(ValidationStrings),ErrorMessageResourceName="StringLengthRange",MinimumLength=6)]
        public string EmailAddress { get; set; }

        [Range(0,100,ErrorMessageResourceType=typeof(ValidationStrings),ErrorMessageResourceName="NumberRange")]
        public int FavoriteNumber { get; set; }

        [StringLength(15,ErrorMessageResourceType=typeof(ValidationStrings),ErrorMessageResourceName="StringMaximumLength")]
        public string FirstName { get; set; }
    }
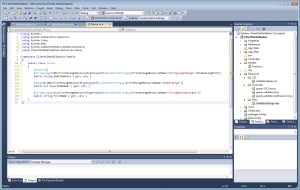


Step 11: Build the Project by hitting “F6” or going to “Build > Build Solution”


Step 12: Add a new Controller to your “Controllers” directory and name it “homeController”
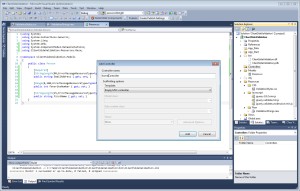

Step 13: In the “homeController” class, right-click inside of the “Index()” method, then select “Add View…”

Step 14: In the “Add View” window, select the checkbox for “Create a strongly-typed view”, then select the “Person” model that is located in the dropdown box. If you don’t see the Person model, you need run a Build (F6).


Step 15: Add the following Razor scripts to your Index.cshtml page:

@model ClientSideValidation.Models.Person
<html>
<head>
    <title>Clientside Validation Example</title>
    <link href="/Resources/CSS/ValidationStyles.css" rel="stylesheet" type="text/css" />
    <script src="/Resources/Javascript/jquery-1.8.2.min.js" type="text/javascript"></script>
    <script src="/Resources/Javascript/jquery.validate.min.js" type="text/javascript"></script>
    <script src="/Resources/Javascript/jquery.validate.unobtrusive.min.js" type="text/javascript"></script>
</head>
<body>
    <h2>
        Clientside Validation</h2>
    @using (Html.BeginForm())
    {
        @Html.ValidationSummary()
        <br />

        @Html.LabelFor(m => m.FirstName)
        @Html.TextBoxFor(m => m.FirstName)
        @Html.ValidationMessageFor(m => m.FirstName)
        <br />

        @Html.LabelFor(m => m.EmailAddress)
        @Html.TextBoxFor(m => m.EmailAddress)
        @Html.ValidationMessageFor(m => m.EmailAddress)
        <br />

        @Html.LabelFor(m => m.FavoriteNumber)
        @Html.TextBoxFor(m => m.FavoriteNumber)
        @Html.ValidationMessageFor(m => m.FavoriteNumber)
        <br />

        <input type="submit" />
    }
</body>
</html>
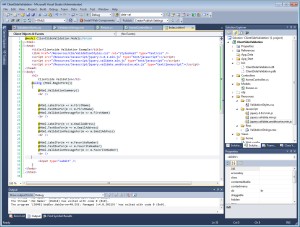

Step 16: Ready to go! Run (F5) the MVC project and test out the client-side validation.


Step 17: Do yourself a favor and check out the rendered HTML (View Source). You’ll notice the auto-generated “data-val” (spoken as “data dash val”) attributes that are located within the HTML elements. These attributes are used by the “jquery.validate.unobtrusive.min.js” jQuery pack.

Here’s what the rendered HTML looks like:


<html>
<head>
    <title>Clientside Validation Example</title>
    <link href="/Resources/CSS/ValidationStyles.css" rel="stylesheet" type="text/css" />
    <script src="/Resources/Javascript/jquery-1.8.2.min.js" type="text/javascript"></script>
    <script src="/Resources/Javascript/jquery.validate.min.js" type="text/javascript"></script>
    <script src="/Resources/Javascript/jquery.validate.unobtrusive.min.js" type="text/javascript"></script>
</head>
<body>
    <h2>Clientside Validation</h2>
<form action="/" method="post">
<div class="validation-summary-valid" data-valmsg-summary="true">

<ul><li style="display:none"></li></ul></div>

<br />

<label for="FirstName">FirstName</label>

<input data-val="true"
	data-val-length="The string must not be more than 15 characters"
	data-val-length-max="15"
	id="FirstName" name="FirstName" type="text" value="" />

	<span class="field-validation-valid"
	data-valmsg-for="FirstName"
	data-valmsg-replace="true"></span>

	<br />

<label for="EmailAddress">EmailAddress</label>

<input data-val="true"
	data-val-length="The string must be between 6 and 80 characters"
	data-val-length-max="80"
	data-val-length-min="6"
	data-val-required="The EmailAddress field is required."
	id="EmailAddress" name="EmailAddress" type="text" value="" />

	<span class="field-validation-valid"
	data-valmsg-for="EmailAddress"
	data-valmsg-replace="true"></span>

	<br />

<label for="FavoriteNumber">FavoriteNumber</label>

<input data-val="true"
	data-val-number="The field FavoriteNumber must be a number."
	data-val-range="The number range must be between 0 and 100"
	data-val-range-max="100"
	data-val-range-min="0"
	data-val-required="The FavoriteNumber field is required."
	id="FavoriteNumber" name="FavoriteNumber" type="text" value="" />

	<span class="field-validation-valid"
	data-valmsg-for="FavoriteNumber"
	data-valmsg-replace="true"></span>

		<br />
        <input type="submit" />
</form>
</body>
</html>

Unobtrusive Javascript Datadash Keywords

Here is a list of “data-” (data dash) keywords for Microsoft’s Unobtrusive Javascript package jquery.validate.unobtrusive.js.

  • data-val
  • data-val-length
  • data-val-required
  • data-valmsg-for
  • data-valmsg-replace
  • data-val-length
  • data-val-length-max
  • data-val-length-min
  • data-val-email
  • data-val-equalto
  • data-val-equalto-other
  • data-val-remote
  • data-val-remote-additionalfields
  • data-val-remote-url
  • data-val-number
  • data-val-range
  • data-val-range-min
  • data-val-range-max

Notes on ASP.NET MVC

The Tenets of MVC

  1. Separation of concerns
  2. Convention over configuration
  3. Keep it DRY: Don’t Repeat Yourself
  4. Be helpful, but get out of my way

The MVC URL Pattern

/domain/controller/action-method/id

Controllers in MVC

A Controller must:

  1. Implement the System.Web.Mvc.IController interface. However, typically we will implement the  System.Web.Mvc.Controller abstract class which inherits the ControllerBase class which, in turn, inherit IController.

  2. Have a name ending in “Controller”
  3. Be marked as “public” – not “abstract” – and cannot take generic parameters

Action Method Qualifications

  1. Method must meet requirements to be action method:
    • Must be public – not static or shared
    • Cannot be defined on System.Object or Controller (i.e. ToString() could not be an action method)
    • Cannot be a special method
    • Cannot have a NonAction attribute
  2. Action Invoker uses reflection to find candidates
    • All methods with same action name
    • But method attributes can make this murky with multiple candidates

Dynamically Generate HTML in ASP.NET (in Code-Behind)

I do not enjoy working with ASP.NET Form Controls. I prefer to use regular HTML controls and, then, use C# to dynamically generate the HTML that I want to send to the browser.

In a previous post I discussed how to create a <select> element with dynamically generated <option> elements. Although the example in that post works fine, it is a bit cumbersome to write and very ugly to look at.

Here, I propose a different way for generating the same HTML.

In the code-behind of my ASP.NET application, I have a method that will return a string that was generated by looping through a list of entities where each entity is wrapped with HTML <option> element syntax:

protected string GetControllerOptions()
{
string options = "<option value='-9999'>Select a controller...";
string selectedAttribute = string.Empty;
foreach (Controller c in GetControllers())
{
selectedAttribute = this.ControllerInScope.ControllerId == c.ControllerId ? "selected" : string.Empty;
options += "<option " + selectedAttribute + " value='" + c.ControllerId.ToString() + "'>" + c.ControllerName;
}
return(options);
}

In the .aspx source page I have the following:

<select onchange="GoToUrl('?conscopeid=' + document.getElementById('selControllerScope_ControllerId').value);"
name="selControllerScope_ControllerId">
<%= this.GetControllerOptions() %>
</select>

The reason why I prefer this method of generating HTML is it moves the “work” of if/then/else statements to the code-behind (which is where it should be) and makes for a cleaner HTML page. In other words,

<%= this.GetControllerOptions() %>

is much nicer to write (and look at) then ….

....
<option value="-9999">Select a controller...</option>
<% foreach (Controller c in this.UserControllers)
 {%>
<option <% if (ControllerInScope.ControllerId == c.ControllerId)
 { %>selected<%} %> value="<%= c.ControllerId %>">
<%= c.ControllerName%></option>
<%} %>
</select>

… don’t you think?

Loop through a Collection in ASP.NET

The syntax for manually looping through a collection object in your ASP.NET looks like this:

  <select>
     <% foreach (string s in this.myCollection){%>
          <option value="<%= s %>"><%= s %></option>
     <%} %>
  </select>

The above example is looping through a generic List of strings (i.e. List<string> myCollection) to create a <select> control that dynamically creates the <option> elements.

Disable Browser Caching in ASP.NET

If your ASP.NET application enforces users to log in to access their stuff, you may consider adding code that will tell the client browser to not cache your web app’s pages.

For example:
Say Bert logs into your web application (via username/password), then he goes to certain pages of the application that contain confidential information. After some time, Bert logs out of your web application and walks away from the computer.

After Bert is gone, Ernie takes the driver seat of the same computer that Bert was on and opens up the same browser. If Ernie were to open the browser’s history (cache), Ernie would be able to view Bert’s confidential pages.

To keep this problem from occurring, I added the following code to my application’s .MASTER page:

        protected void Page_Load(object sender, EventArgs e)
        {
            //Tell the client browser to not store cached pages of this app.
            Response.AddHeader("Cache-Control", "no-cache, no-store, max-age=0, must-revalidate");            
        }

Implement Form Authentication in ASP.NET

To configure your ASP.NET web application to use Forms for authentication, add this to your Web.Config

<configuration>
    <system.web>
      <authentication mode="Forms">
        <forms loginUrl="/login.aspx" timeout="30"/>
      </authentication>
    </system.web>
</configuration>

Then, to specify which directories and/or files require (or don’t require authentication), add this to your Web.config

<configuration>
    <system.web>
      <authentication mode="Forms">
        <forms loginUrl="/login.aspx" timeout="30"/>
      </authentication>
    </system.web>

  <location path="">
    <system.web>
      <authorization>
        <deny users="?"/>
      </authorization>
    </system.web>
  </location>

  <location path="anon">
    <system.web>
      <authorization>
        <allow users="?"/>
      </authorization>
    </system.web>
  </location>
</configuration>

In the above configuration, the first <location> element specifies that all directories and files will be denied if the user hasn’t logged in. The second <location> element specifies that the directory named “anon” (and all of its children) are allowed anonymous access (i.e. users do not need to log in in order to access those directories and files.

Note that the <authentication> element and the <location> element work together. The <authentication> element specifies that forms will be used to log the user in AND will automatically direct the user to the specified login page if/when the user goes to a secure directory or file. The <location> element(s) on the other hand, specify which directories and files are accessible or not.

A word from Microsoft

The quote below was taken from MSDN article entitled “ASP.NET Authentication“..

Forms (Cookie)
The Forms authentication provider is an authentication scheme that makes it possible for the application to collect credentials using an HTML form directly from the client. The client submits credentials directly to your application code for authentication. If your application authenticates the client, it issues a cookie to the client that the client presents on subsequent requests. If a request for a protected resource does not contain the cookie, the application redirects the client to the logon page. When authenticating credentials, the application can store credentials in a number of ways, such as a configuration file or a SQL Server database. For more information, see Forms Authentication Provider.

Note An ISAPI server extension only handles those resources for which it has an application mapping. For example, the ASP.NET ISAPI server extension only has application mappings for particular resources, such as .asax, .ascx, .aspx, .asmx, and .config files to name a few. By default, the ASP.NET ISAPI server extension, and subsequently the Forms authentication provider, does not process any requests for non-ASP.NET resources, such as .htm, .jpg or .gif files.

Pros
Makes it possible for custom authentication schemes using arbitrary criteria.
Can be used for authentication or personalization.
Does not require corresponding Windows accounts.

Cons
Is subject to replay attacks for the lifetime of the cookie, unless using SSL/TLS.
Is only applicable for resources mapped to Aspnet_isapi.dll.